Showing posts with label TECH MANIAC. Show all posts

Wednesday, 21 August 2013

READ FACEBOOK CHAT MESSAGES WITHOUT READ NOTIFICATION

If you are using Facebook’s default Messenger application you may have noticed that it sends read notifications automatically whenever you or a chat partner read messages in the app. While that is mighty useful at times, for instance to make sure that your date has indeed received word that you will be late a couple of minutes, it can also be stressful at other times.

Some feel pressured to answer right away when the other party knows that they have read the email, and senders may get irritated when they see that you have read a message but do not respond to it.

Privy Chat for Facebook is a free Android application that serves two main purposes. It first lets you read all Facebook chat messages and access all conversations that you have received in the past without read notifications. This means that you can read new messages without feeling pressured to reply immediately, because senders do not know that you have already read their messages.

You can furthermore retrieve a list of online friends from Facebook to see who is online and who is not.

You need to enter your Facebook login information on first start and allow Privy Chat for Facebook to access your public profile,  messages, chat status, friend’s chat status and to manage your messages on the social networking site.


The app displays a list of messages sorted by recency in its interface afterwards. It displays the sender’s profile photo, name, part of the message, time and an indicator whether the message has been marked as read or not. A closed eye indicates that the sender has not received read notifications yet, while an open eye means that this is the case.

The read notification is transferred as soon as you reply to a message in the application.

The application has two issues right now. It is currently not possible to start conversations using it. While you can reply to all participants who have messaged you or who you have messaged in the past, you cannot initiate a new conversation. There is also no way to send messages to group conversations.

A second issue is the inability to display some attachments, e.g. images attached to messages.

Verdict

Privy Chat for Facebook is currently only available for Android. It is not the only application available that provides you with that functionality. Most third party Facebook chat clients, for instance those based on Jabber, are not sending read notifications when you are using them.
Read More

HOW TO CHOOSE A SECURE PASSWORD


For almost every account that you make online, you are required to make a secure password. Choosing one that people can’t figure out is a matter of creating unlikely letter and number combinations. Here is a guide on to how-to make a hard-to-crack password.

 Steps
  • Use length to your advantage. 
Create a password that has eight or more characters since this is usually the minimum for most password requirements. The longer the password the more secure it is likely to be.

  • Form a “random” sequence of words and/or letters. Create a phrase or series of letter that is seemingly “random” but is easy to remember. Call this your “base-word.”
Example: My children are Jessie, Cassey, Michael and Jenny, so my base-word becomes “jecamije”.
Example: My first house was on Spooner Street becomes “houseonspooner”.


  • Add numbers to the base-word to make it more secure.
Example: Add the ages of the children to the end making it “jecamije22191612″.
Example: Add the house number to the end of the base-word to create “houseonspooner1500″.

  • Use punctuation and symbols to “complicate” it further.
Example: Add random punctuation to create “jecamije_22191612″.
Example: Add a symbol to the word to make “houseonspooner#1500″.

  • Create complexity with upper and lowercase letters.
Example: Take advantage of adding capital letter to create “JeCaMiJe22191612″.
Example: Add the house number to the end of the base-word to create “houseonSpooner1500″.

  • Generate similar but altered passwords. 
Use the same or similar base-words to help you remember your passwords easily without making them “too” easy to crack.


  1. Example: “JeCaMiJe_22191612″ can become “mykidsJeCaMiJe-90807060″ or “12161922*JeCaMiJe”.
  2. Example: “HouseonSpooner#1500″ can become “1500*myfirstHouseonSpooner” or “***15HouseonSpooner00″.

Read More

Tuesday, 20 August 2013

GOOGLE ADDS RECENT ACTIVITY TO THE ACCOUNT SECURITY DASHBOARD

Google has been displaying account activity information on Gmail for some years now. The feature, available with a click on details on the service's start page, highlights the most recent sign in activity. It not only highlights the access type, e.g. browser or pop3/smtp, but also the country and IP address the sign in was made from and the date & time of the connection.

If you are from the US and suddenly spot a connection from another country, it may very well be that your account got hacked.You do not necessarily have to open the page in this case, as Google is warning you automatically when it notices unusual account activities.

The new Recent Activity feature works in a similar fashion but in a broader scope. Instead of just highlighting sign ins, it covers other areas of interest such as the creation or deletion of app passwords, the change of the account password, or changes to the account's recovery options.


You can open the Recent Activity dashboard either from this link directly, or with a click on the profile photo of the account in the header when you are on a Google property, the selection of Account, a click on Security and then finally Recent Activity.

Google displays the location the activity was recorded from on a map on the right. It is using the IP of the connection to determine the location which works well unless a proxy or virtual private network was used.

You can click on details here to display the full IP address, browser version and platform which may provide you with additional information about the legitimacy of the activity.

A button lets you change the account password right away on the page if you spot suspicious account activities.

Unlike Gmail's activity report, which lists only sign ins to Gmail, the Recent Activity report highlights sign ins from all Google products. Note though that this covers only web-based sign ins and not the retrieval of emails or other related activities.

It is a good idea to check the page regularly to make sure that no one but you got access to your account.
Read More

Monday, 19 August 2013

GO BACK TO YOUTUBE'S OLD BUFFERING TO SKIP WITHOUT REBUFFERING

Some time ago YouTube switched to the new Dynamic Adaptive Streaming over HTTP (DASH)  buffering technology that segments media streams into blocks.  Dash supposedly improves video playback for fast connections, and while that is often a great thing, it has one slight drawback that you may have noticed when you are skipping in videos or when you used to hit pause to let the video buffer completely.

The first thing that you may notice is that YouTube is no longer buffering all of the video when you hit the pause button. In fact, when you hit pause the buffering stops right away and will not commence until you hit the play button again.

The second issue that you may have with Dash is related to that. When you skip, you may notice that it takes a moment before the buffering kicks in and the video starts to play. This is more severe on slow Internet connections where it take more than a second or so.

If you prefer the old way of buffering on YouTube, for instance because you are on a slow connection and prefer to hit pause to wait for the video to buffer fully before you hit play to avoid any hiccups during playback, then you can use third party tools like YouTube Center for that.

YouTube Center is available for most modern web browsers as a native extension and also as a userscript that you can install instead. It is fully compatible with Google Chrome, Mozilla Firefox and Opera among other browsers.

I have installed the extension in Firefox to demonstrate its functionality. Once you have installed the add-on in Firefox, you will notice a new cog icon next to the sign in or account related link at the top right on YouTube. When you click on it, the scripts preferences appear right on the screen.

Here you need to switch to the Player tab and locate the Dash Playback preference in the first group near the top of the screen. Uncheck the option to disable Dash Playback. The change is immediate and all videos that you play from that moment on use the old buffering technology on YouTube.


This means basically that you can hit the pause button to buffer videos 100% on YouTube before you play them on the site. If you are on a fast connection, you may also benefit from this as the video will buffer all the way through and not in chunks like before.
Read More

Sunday, 18 August 2013

CONVERT,COMPRESS OR RENAME FILES AUTOMATICALLY IN MICROSOFT WINDOWS

Folder Actions for Windows is a free for home-use program for the operating system that provides you with a selection of automated actions that you can configure on your system.

It supports five different kinds of actions:


  • Show new file alerts when files are moved into a selected folder.
  • Rename files in monitored folders.
  • Convert image, audio or video files into a different format.
  • Compress or unpack files.
  • Run a user defined action using batch files.

Here is how it works in detail.

Once you have installed the application on your system and started it up, you are presented with a two-pane interface. The left side lists all the folders that you want to run actions on, the right the automation options that you can configure.

Add at least one folder using the plus icon and select the desired action from the right. You can for instance select the video folder and the convert video files to action, or an incoming or download folder and the action to decompress any zip archives in that folder...


You can add as many folders as you like and select an action from the right for each folder individually. When you switch folders on the left, the selected automation is automatically displayed to you so that you know what is going on. There is no indicator prior to this though and the developer should consider adding it to the folder listing so that users know on first glance what kind of action is executed on that folder.

The only other option available is to include subfolders in the process. This can again be activated for each folder individually.

Depending on the action selected, you may get a notification on the screen telling you that a new file has been moved to a new folder, or no indicator whatsoever. Conversions for instance are processed silently in the background so that you need to check out the destination folder manually to find out if those operations have been completed.

You can open the processing queue on the other hand for that as well. To do so, right-click the icon in the system tray and select the option from the context menu.

Verdict

Folder Actions for Windows could use a couple of additional features, like a notification option when all files have been processed, the action indicator in the folder pane, or (additional) conversion options for videos or images.

Those would make this useful program even better. If you want to automate some tasks on your system, and those tasks are supported by Folder Action for Windows, then you may want to give this a try to see how it works out for you.

Note that the program will add itself to the auto-start automatically of the operation system, and that it has to run in the background.

Read More

Saturday, 17 August 2013

HOW USEFULL IS THE NEW GMAIL INBOX

As you may know already, Google has added a new feature to its Gmail email service that it states will put you back in control of your inbox. The feature will roll out over the coming weeks with many Gmail users reporting that it has been already activated for their account.

You can check that easily with a click on the settings icon in the top right corner on Gmail. If Configure Inbox is displayed here in the context menu, your account has been updated.

A click on the link opens a small overlay screen that you use to configure the feature. You need to move the mouse cursor over items here to display information about each tab that you can enable on Gmail.

Anyway, up to five tabs are displayed on top of the list of emails afterwards. These tabs act as filters that sort emails based on type.


The five tabs that you can activate here are the following:

  • Primary - lists person to person communications, as well as starred messages by default.
  • Social - messages from social networks, dating services, social media and other social-related sites.
  • Promotions - includes deals, offers and most marketing emails.
  • Updates - Personal updates including confirmations, receipts. bills and statements.
  • Forums - Emails from mailing lists, forums and other discussion-based services.
  • The sorting works considerable well where social is concerned, but that is to be expected as Google is probably filtering messages by domain here. The remaining tabs all include messages that should have been sorted into different tabs. The updates and forums tab included press releases for instance which does not really fit either of the groups.


While it is possible to move mails around via drag and drop, it is clear that you will have to monitor all tabs regularly because of this.

Turning it off

You can turn off the new tabs easily again.

Click on the settings icon and select Configure Inbox from the options.
Uncheck all options here so that only primary remains checked (you cannot uncheck primary).
Click on save.
When you go back to your inbox, you notice that all tabs have been removed from it again.

Video

Google has created a video that demonstrates the new functionality of the inbox.


Read More

Friday, 16 August 2013

ENCRYPT ANDROID PHONE CONVERSATIONS WITH REDPHONE

RedPhone is an application for Android devices that can encrypt phone conversations on the device. It is open source, with the source code readily available on GitHub so that you can audit and compile it at anytime.

The app uses voice over IP technology (voip) to encrypt phone calls, which means that the calls made using it are handled by a data plan.

The first thing you are asked to to after you install RedPhone on your mobile phone is to register your phone number with the service. This is a semi-automated process, with the number filled out automatically. All you have to do is make sure it is correct before you hit the register button to continue.

The phone number that you have selected will then be verified with a SMS that is automatically detected by the application.

You are then taken to the address book displaying all your contacts. While you can call contacts from here right away, you need to be aware that the contact too needs to run RedPhone on the device. This is definitely a limitation as the app is limited to Android right now. If the recipient uses an iPhone, Windows Phone or a landline, it is not working at all.

Anyway, when RedPhone notices that a phone number is not using the application as well, it is offering to send a RedPhone install link to that phone number via SMS, or to call it regularly.


RedPhone is using SRTP to encrypt calls and ZRTP to negotiate the keys. If both parties use RedPhone, the app uses the keys from both users to generate a simple passphrase that is displayed on both screens. Users need to exchange the passphrase to make sure it matches and that no one tapped the line or intercepts it with a man-in-the-middle attack.

You can access additional information about the encryption used here on GitHub.

The core benefits of RedPhone are that it uses regular phone numbers to make encrypted calls, so that you can get started right away, that it is open source, and that it is using a wireless or data connection and not your plan's minutes.

The downsides are that it is currently only available for Android, that both parties need to have it installed, and that both parties need to verify the created passphrase to make sure that the connection is save.

Verdict

The Android limitation is probably the factor that is keeping the application from reaching a larger audience. It offers several benefits that make it attractive though, like the easy installation.

If you have a couple of contacts that use Android, and that you want to talk to using encryption, then you may want to give this application a try.
Read More

Monday, 12 August 2013

PLAY MP3 FILES DIRECTLY ON GOOGLE DRIVE

Google Music is Google's go to service for all things music. While that is the case, I'm not entirely sure if users from all over the world have access to it. While I do have access, I cannot use all features that Google makes available in this regard.The All Access music streaming service is for instance not available in my country yet.

You can upload music files to Google Music to play them online, but that is not the only option that you have. You can also host music on Google Drive and while it was previously possible to play those songs in the browser directly, a recent change seems to prevent this from happening now.

Music files seem to open up with the default Google Drive Viewer app which does not play them. While you are taken to a preview page, it simply states "no preview available", and that you can download the file or use one of the apps that you have installed to open it.


It is however easy to get Google Drive to play mp3 files directly on the site without downloading them first to your computer. Follow these easy steps to enable this for your account:

Play mp3 on Google Drive

It is easy if you already have at least one mp3 file on Google Drive. Browse to a mp3 file and right-click it
Select Open With > Connect More Apps from the context menu that opens up.
Find Music Player for Google Drive in the list. You can enter music to find it faster.
Click connect and follow the on-screen instructions.
Double-click on the mp3 again once you are back on Google Drive.
You will receive a prompt asking you to allow access to Music Player for Google Drive.
Click on Allow access and the music should start to play in an on-screen player right away.
If you have no mp3 file on Google Drive right now do the following instead:

Click on Settings in the upper right corner and select Manage apps from the menu.
Click on Connect more apps and follow the instructions above from 3. on.


You can play one or multiple audio files to the playlist to play them all one after the other.

Keep in mind: All music that you upload to Google Drive counts against your storage limit whereas you can upload 20,000 songs to Google Play Music without affecting it.
Read More

GOOGLE TO SHOW ADS ON MAP APP


 Search giant Google has reportedly added an ad-feature to 

its Maps service, allowing users to quickly call, save or share 

the particular location searched for. 

According to tech-site Mashable, Google will show ads when 

a user performs a search on its apps for iPhone, iPad and 

Android. 

If a user searches for a particular store in Brooklyn, an ad 

may appear as a small white banner at the bottom of the 

screen and when the user clicks upon it, information related 

to address, working hours, reviews, call button, etc. will be 

displayed. 

The report said that advertisers are charged on a cost-per-

click basis when a user first clicks on the bottom banner and 

again if a user asks for directions, calls the business or clicks 

on the link to the business' website. 

Product manager of Google Maps, Salahuddin Choudhary 

said that advertisers will be charged a maximum of two 

clicks 

per impression, while announcing the new service which is 

expected to boost the ad revenue that the company pulls 

from mobile search, the report added.

Read More

Sunday, 11 August 2013

GOOGLE ROLLING OUT NEW FEATURES FOR NEWTAB PAGE

Google popularized the "New Tab page" with its Chrome web browser, a feature that Firefox has also adopted. The Chrome version has many cool features, such as your most viewed web pages, a Google search box, access to the Chrome store, apps and the ability to customize the background from an array of images provided in the store. Customers can even use their own images to create a theme, though this requires an app called My Chrome Theme.

Now Google is rolling out changes to this page, and users are beginning to see a pop-up message when visiting the page. The message attempts to explain the changes.

First up is the Google search box, which displays the traditional Google logo above it. This will now show the Google Doodle above the box -- providing there happens to be one, which is far from everyday. Its a minor change, but for those who do not actually visit the Google.com page often, it will ensure that we don't miss the Doodle. It is a feature the company brought to Google Now already.

Next up, the search giant has removed access to apps from this page, but you can now access them from anywhere, as the feature has been moved to the bookmarks bar at the top of the screen. You will find the option at the far left side. Alternatively, you can always simply type chrome://apps into the omnibar as well.


Finally, Recently closed tabs, which could always be accessed by right-clicking a current tab (and still can be), but only provides the most recently closed tab, meaning that a tab closed five pages ago requires repeating the process five times. Now Google has added the feature to the options menu, under Recent Tabs, which displays a number of your most recent pages.

Conclusion

The new page seems mostly designed to make things more confusing, as opposed to keeping everything in one simple location. On the whole, I am finding it to be less user friendly, though the Doodle is a nice touch, as is the access to numerous closed tabs -- though this can be accessed from anywhere. The Chrome Store, also is not as easily accessed. Like anything though, it will just take some getting used to.

Read More

SPYGLASS~A PRETTY DATA VISUALIZER FOR WINDOWS

Spyglass is a different kind of application, not really an Explorer alternative but a file browser nevertheless. It reminds me a lot of programs that analyze the space distribution of a folder structure, drive or partition on Windows, but that is not really what it is all about.

After you have installed Spyglass you are asked to select a folder or drive for analysis. Just drag and drop it to the program window or use the browse button instead.

The scanning may take some time depending on what you have selected. If you are selecting a root drive, you may notice that it will take minutes before first results appear on the screen. That's however not the end of the scan, as the program will run a duplicate file scan afterwards automatically.


The screen is divided into two parts. On the left is a list of the largest folders and files of the selected path, and on the right the same data visualized in sunburst view.

You can select any folder on the left to jump right into it, or use the sunburst view instead for navigation. It does look pretty and all, but it is not really practicable if you are looking for specific files or folders.

A click on the curled arrow in front of folder and path information lets you jump right to that folder in Windows Explorer, a useful feature as you can perform all sorts of file operations there then.

A right-click opens a context menu with additional options. You can open the selected file or folder in Explorer, delete it permanently right away, or send it to the trash instead.

The duplicate file finder on the other hand appears to work really well. While it takes time until scans are finished by the module, it will display a list of duplicate files afterwards in its interface. The results are sorted by name by default with options to change that to size, count or modification date.

There is no option to process the file list automatically, or at least with automated help to speed things up. That's makes it okay for finding the largest duplicate files on the system, but if you need more than that, you will discover that other programs are better suited for that task.
Read More

HOW TO PROTECT PASSWORDS IN GOOGLE CHROME

Check if your passwords are stored in clear text in Chrome

To see whether your Chrome saves passwords, do the following:

Type chrome://settings/ in the address bar and hit the enter key.
Click on Show advanced settings at the bottom to display more preferences.
Scroll down to the passwords and forms section and click on Manage saved passwords there.


When you hover over a saved password here, you will notice that a show button appears in the password field. When you click it, the password is revealed so that you can copy or remember it.

To avoid that this is happening, make sure the "Offer to save passwords I enter on the web" box on the preferences page is not checked. This prevents Chrome from recording new site logins automatically.

Password protection

But how can you protect your passwords in Chrome then? The answer is by installing a browser extension, or by using a desktop password manager.

Chrome users can install the free Last Pass for example which protects all passwords with a master password that you select. It adds many other features to the browser, like the ability to sync passwords between different web browsers, form saving, the ability to save other data in your password vault and more.

Last Pass is definitely one of the most convenient options that you have, as it integrates directly in the browser. Setup may take a couple of minutes but once you are done, you are all set and it will run in autopilot.

If you prefer to use a desktop program instead, for instance because you do not want your passwords to be saved in the cloud, then you may want to use a program like KeePass instead.
Read More

Wednesday, 6 February 2013

REMOVE ALL TRACES OF THE AVAST PRODUCTS FROM YOUR SYSTEM

Security software sometimes may not uninstall properly on a system it is installed on. It can be that the default uninstaller that ships with the program is broken and thus non-functional, or that it leaves traces behind that prevent the installation of an update, other version or third party product on the system.
The majority of companies that produce security software for Windows make available removal tools that delete all traces of a product from a system. These tools use hard coded lists of files and locations usually and are considered thorough because of it. Sometimes, they combine the list with searches to make sure that all program files and Registry information are removed from a computer system.
The Avast! Cleanup Tool is a third party program that is not to be confused with the company’s official removal program Avast! Uninstall Tool.
Why you’d use a third party program when there is a first party program available for the same task? Because you do not have to run it in safe mode which you need to do when you use the official Avast utility. It may also be your only hope if the official program for one reason or the other does not work properly.
First thing you need to make sure is that it is supporting the version of Avast! that you have installed on your system. At the time of writing, it is supporting the following versions:
  • Avast! Antivirus 7.x Free/Professional/Internet Security
  • Avast! Antivirus 8.x Free/Professional/Internet Security/Premier
You should not use the program if you are running a different Avast product or version of a supported product. To completely uninstall a supported version of Avast, simply run the tool after you have downloaded it to your system. First screen displays information about the program and its intended uses. Once you click on accept, you will notice that two command line prompts are launched that perform the uninstallation of Avast software on the system.
avast cleanup tool
Please note that the cleanup tool is only compatible with Windows Vista or newer versions of Windows, and not Windows XP.
The program can be useful if you need to remove supported Avast software from a Windows system and can’t or do not want to use the official uninstaller to do so.
It is highly recommended to try the official Avast tool first before you make use of third party software.
Read More

ADD PASSWORD PROTECTED BOOKMARKS TO GOOGLE CHROME

f your computer is used by multiple users, you sometimes may want to protect “sensitive” data from the prying eyes of others. While it is recommended to use user profiles, it is quite common that a family uses a single profile for all of its work on the computer for instance.
Bookmarks are usually not the top priority when it comes to protecting data from other users who have access to a system, but if you want to make sure that a couple of bookmarks are not accessible to other users or people walking by you may want to give a solution like Secure Bookmarks for Google Chrome a trial run.
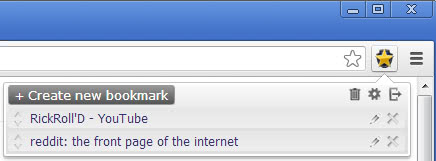
The extension adds an icon to Chrome’s address bar after installation. The first thing you need to do after installation is to set a password to protect the data. Once that is out of the way you can start adding websites to the storage with a click on the icon and the selection of create new bookmark.
secure bookmarks chrome
The program adds the website you are currently on by default which you can modify manually if you want. You can also edit any existing bookmark at any time.
You may have noticed by now that the extension ignores the current bookmarks. An import is missing unfortunately which may mean that you need to open existing bookmarks in Chrome again to add them to the secure bookmarks extension.
To open an existing bookmark, simply left-click on the icon and then on the bookmark. This opens it in the same tab, if you prefer it to open in a new tab, hold down the Ctrl-key while you click on the bookmark.
The order of bookmarks can be ordered via drag and drop but there is no option to use folders to sort bookmarks. The options let you export and import bookmarks to the browser, and change the password.
The main menu has an option to clear all bookmarks at once and to sign out which you can do to block access to the bookmarks while Chrome is open. You are automatically signed out when the browser is closed.
Read More

FIREFOX 18.0.2 WILL RESOLVE CRASHES WHEN ON FACEBOOK

Ever since Firefox 18.0.1 was released part of the web browser’s user base experienced crashes on the world’s most popular social networking site Facebook. The crashes, experienced not only by stable channel users of Firefox but also by beta, aurora and nightly users, have been identified by Mozilla to happen almost exclusively on Facebook. Some users of the browser reported Firefox freezing when they go to Facebook, while others reported that it would crash when they did so.
It took Mozilla some time to figure out what was going on. You can go through the original bug listing over at Bugzilla for more information. First signs of the bug appeared on December 30, 2012 when it jumped to the 32nd spot of the top browser crasher listing that Mozilla maintains.
At the end of January, the bug accounted for almost 18% of all crashes in Firefox 18.0.1 which is a very large number for a single crash.
The cause for the crashes on Facebook was discovered in cx->enumerators, a balanced stack of active iterator objects. David Anderson explains why Firefox crashed in the bug listing that fixed the issue.
In practice, it is really difficult to keep it correctly balanced, because the JS engine has so many different ways of leaving execution modes, and the try-note-iter mechanism itself is fairly delicate.
Since the enumerator list is unrooted, when it becomes unbalanced, its items can become garbage collected and later crash.
The bug fix has already landed in development versions of Firefox and Mozilla is preparing Firefox 18.0.2 which will be released later today if things go ahead as planned. Keep in mind that while Firefox 18.0.2 is already available for download on the Mozilla ftp server, it is not 100% certain that this will be the final release as last minute changes can happen at any time.
firefox 18.0.2
Still, if you are experiencing crashes on Facebook currently you may want them resolved as soon as possible. You can download the releases from this ftp server directory.
Read More

Thursday, 3 January 2013

CONVERT YOUR PC INTO WI-FI HOT SPOT~EXCLUSIVE TRICK


Connectify Pro v3.5.0.23678 | 3.8 MB*

Connectify is an easy to use software router for Windows computers. Users can wirelessly and securely share any Internet connection: a cable modem, cellular card, even another Wi-Fi network with other Wi-Fi enabled devices such as smart phones, laptops, and gaming systems.
Features
1. Take practically any Internet connection and share it wirelessly with no additional hardware, wires, plugs, or chargers
2. Easily connect any number of Wi-Fi enabled devices to your Connectify Hotspot
3. Automatic Internet selection for super simple set-up
4. Customize your hotspot's name and allow it to operate like a wireless repeater for your home or office router
5. Browse Shared folders and other services in your network; Even without an active Internet connection


===========================================
Download link - Eyesfile*
===========================================


Connectify 3.5 Precracked - 3.8 MB 


Connectify Serial.txt - 373 B


==============================================
How To Download {for who cant download}
==============================================
Now the download page will be opened so scroll to the end of the page and click Get Link button.

After it you will be redirected to a new page on which you will write captcha and then scroll to the end of the page and click Create Link.

after it a new tab will be opened just close it and scroll down to the end of the current page and click the link.

After clicking the link,your download will be started and you can download the file.
Read More

Monday, 31 December 2012

HAPPY NEWYEAR TO ALL CRACKPIT VIEWERS


FIRST OF ALL I AM THANKING ALL THE CRACKPIT VIEWERS FOR MAKING US A GREAT SITE IN THE FIELD OF TRICKS IN INDIA.
WE HAVE POSTED ONLY 190 TRICKS TILL NOW FROM SEPTEMBER.EVENTHOUGH WE ARE NOW HAVING NEARLY 125000 PAGEVIEWS THAT IS JUST FROM 4 MONTHS.
SO ONCE AGAIN THANKS TO EVERYBODY..
ALSO AS YOU ALL KNOW EXAM SEASON IS COMING AND I AM PREPARING TOO..SO TILL MARCH THE NUMBER OF TRICKS POSTED EVERYMONTH WILL BE LESS..

ANYWAY WE
WISH ALL OUR VIEWERS A HAPPY AND PROSPEROUS NEWYEAR AND MAY THIS YEAR BE A WONDERFULL ONE IN YOUR LIFE
Read More

Thursday, 27 December 2012

FACEBOOK TESTING BULK DRAG AND DROP PHOTO UPLOADS

Regular Facebook users have become accustomed to receiving user interface and functionality based updates on their accounts during the course of 2012. Although Facebook has added a number of different treats and tweaked the web interface visually a number of times, it looks like they aren't quite done for this calendar year just yet. Users will begin to notice that their accounts are starting to receive an interface based update that affects the publisher box and allows those signed-in to drag-and-drop multiple photographs to initiate a bulk image upload process.
Before they decided to implement this feature – which is actually still rolling out as we speak – users had to add files individually for the purpose of sharing them with their connections through the Timeline or News Feed. The new method of being ableto add a batch of images at once is definitelya positive addition and will be seen as a big user win for those who love the efficiency that an elegant and well thought-out upload system brings.
:

:
Users have been noting that the new drag-and-drop system is steadily starting to roll-out to certain Facebook accounts and as yet hasn't been made available to everyone. The new efficient upload system is also currently not available to those who hold business pages, but it seems like such an efficient process that dramatically minimizes the effort involved in uploading images that it’s highly likely that all accounts will see the changes in the near future.
:

:
In addition to the drag-and-drop upload system Facebook are also experimenting with a number of small but noticeable interface changes on the users profile page. In an attempt to streamline the profile page, they are playing around with getting rid of the unsightly thumbnail images that are usedto access sections like Photos, Friends and the About section in a profile in favor of elegant and understated headers that allow the user to scroll through all profile information without being passed around different pages.
:

:

:
The two new proposed changes aren’t exactly earth-shattering but should definitelyimprove efficiency and allow users to get more images onto their accounts in a quickerfashion which is ultimately what Facebook needs. We’ve seen the company acquire Instagram, make improvements to their own mobile camera apps and are now aiming to improve the experience for those who prefer to access their accounts through the website.
Read More

VERY SECRET AND IMPORTANT TOOL FOR WINDOWS 7~ALL WNDOWS 7 USERS MUST CHECK

Yes It's a Secret Tool and Of Course Not All The Windows 7 Users Ever Heard About It and in Same Time This Tools is Very Useful to You.
This Tool Called PSR (Problem Step Recorder) in This Tool You Can Record All Happened on
Your Screen to Trace and Check What The Problem You Face to Make The T echnician or Friend toHelp You to Solve The Problem and For Me It's Perfect Also to Take a Screenshot Without Any Extra Program, 


Here's How to Open The App. and How It's Work

1- Press Start Button.

2- In Search Box Type PSR or psr.exe

3- Open The PSR Tool


4- Then Press Start Record


5- Open The Program or The Operation Cause The Problem You Face


6- After The Operation Finished Press Stop Record on The PSR Tool

7- The Tool Will Ask You to Type The Name and The Place You Will Save The Zip File of The Problem.

8- The PSR Give You a Zip File YouCan Sent to Technician or Friend to Help You in Solving The Problem. (This is the Main Use of This Tool)
(The 2nd Use of This Tool to Me is Taking a Screen Shot of My Screen Without Any Program)

1- Extract This Zip File It's Give You MHTML File.

2- Open it By Your Browser You Will See a File With Screen Shot of All Happened on Your Screen 3- Save The Image you Want By Right Click Then Save The Image As.

Have Fun With This Great Tool
Read More

HOW TO CHANGE BOOT DRIVE IN WINDOWS


I have two Solid State Drives and one platter-
based drive connected to my PC. One of the 
SSDs contains the Windows 7 operating system, 
the other nothing of importance anymore but 
the System Reserved partition. Any attempt to 
disconnect the drive from the system resulted 
in boot errors due to missing boot 
information. Since I do not really need that 
second SSD anymore I decided to find a way to 
move the System Reserved partition from that 
drive to my new SSD instead so that it would 
boot just fine without the second drive.

After fiddling around with it for a while I 
stumbled upon a solution that it probably the 
easiest option to move the boot information of 
the system to the hard drive the system is 
installed on. Instead of creating a system 
reserved partition on the main hard drive and 
moving the data of the original system 
reserved partition to it, it is possible to 
simply move the boot loader from the system 
reserved partition to the drive the operating 
system is installed on.

Note that you should not do that if you are 
using Bitlocker encryption or any other 
software that is using the system reserved 
partition. As always, it is suggested to 
create a backup of your drive before you 
start. A program you can use for that purpose 
is DriveImage XML. It is free for personal use 
and can backup the full partitions. If you 
prefer to use a different program, check out 

The one program you need to move boot 
information to your primary drive is EasyBCD 
which is available free for personal use from 
the developer website. Scroll down until you 
see the solutions, and click on Register there 
underneath non-commercial. You are taken to a 
page where a click on download downloads the 
file to your system. You do not need to enter 
your email address here prior to downloading.

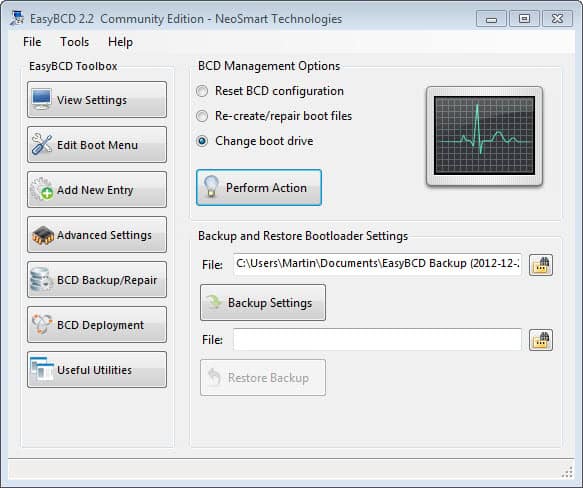
Start EasyBCD after installation and perform 
the following operations:
  • Click on BCD Backup/Repair
  • Select Change boot drive under BCD Management Options
  • Click on Perform Action
easy bcd change boot drive
A popup window is displayed then asking you to 
pick the new drive letter for your system. It 
is usually drive c that you should pick here. 
You will get a success message in the end that 
informs you about the change.

boot partition changed

If the drive the operating system is on is the 
first boot disk, you do not need to change 
anything. If it is not the first disk, you 
need to change the boot order in the BIOS / 
UEFI.

In my case, I simply removed the second Solid 
State Drive from the system to use the primary 
one as by new boot drive.
Read More